Archived: Building ArduPilot with Atmel Studio or Visual Studio & Visual Micro
Warning
ARCHIVED ARTICLE
ArduPilot no longer supports Arduino or AVR.
This tutorial provides instructions for how to set up and build AMP using Atmel Studio 6.2 or Microsoft Visual Studio with the Visual Micro plugin.
Introduction
Want a robust development environment for the APM code? Try out Atmel Studio 6.2 or Microsoft Visual Studio with the Visual Micro plugin. You can edit, build and upload the APM code using these tools. The builds and uploads are the same as with the ArduPilot Ardunio builds.
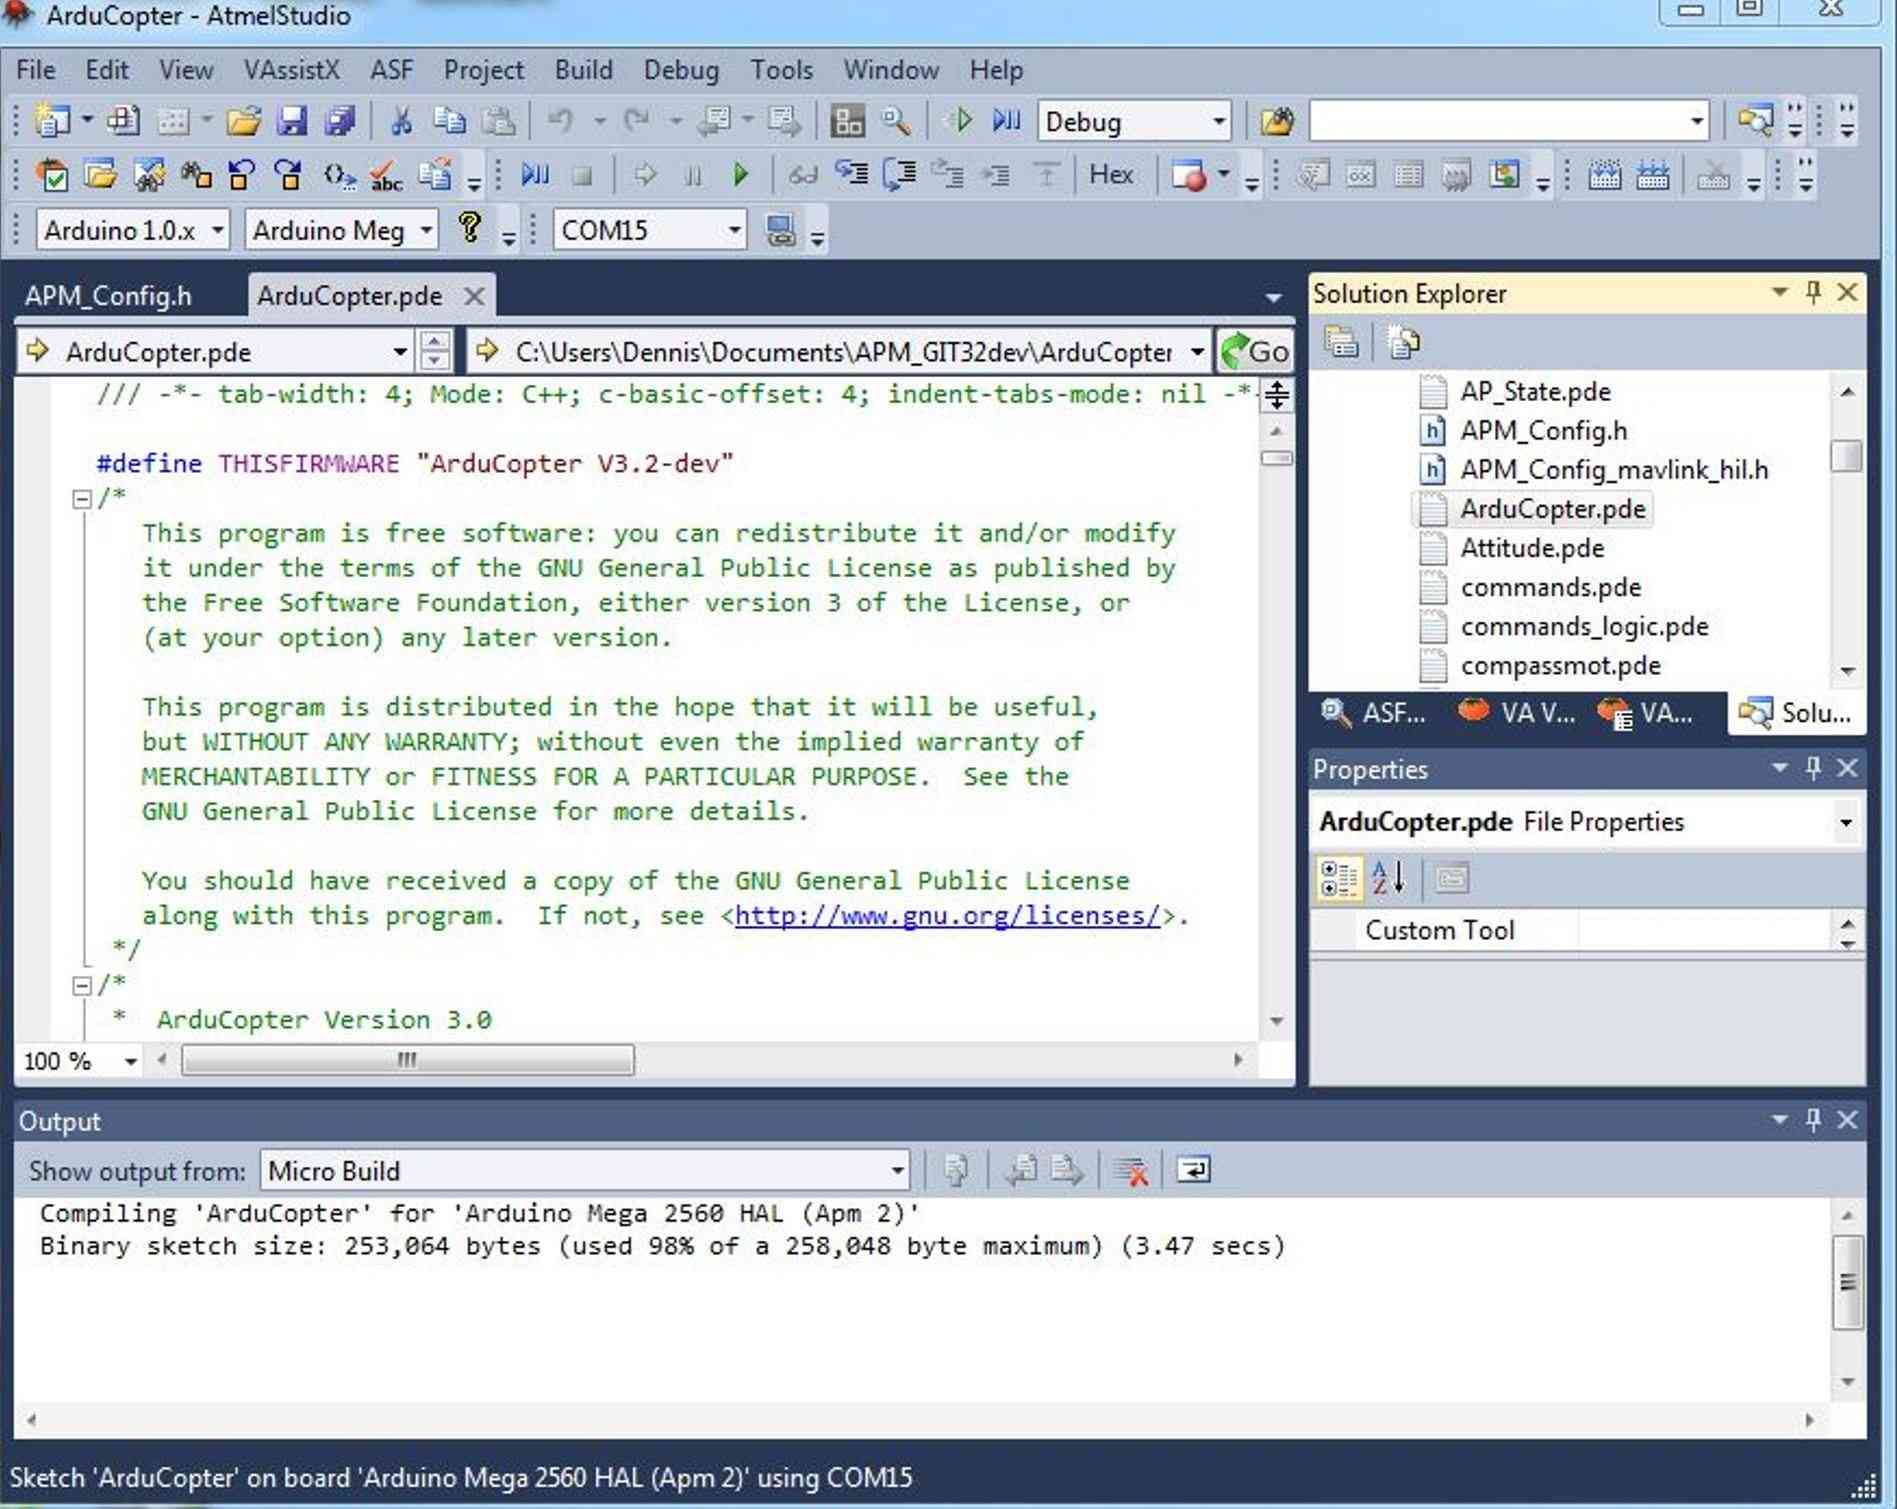
Click the image to enlarge
Overview: Atmel Studio or Microsoft Visual Studio provides a robust Integrated Development Environment (IDE). However, the ArduPilot code is set up to use the special ArduPilot Arduino IDE and that structure does not work in those environments without some plugin to setup the correct structure and provide the up-load tools. Finding the source code for the various functions and classes is difficult using Arduino - sometimes requiring a manual search through multiple folders and files to find the actual source code for one function or class used in the main code setup or loop.
Solution: Visual Micro solves most of these problems. Visual Micro is a plugin to Atmel Studio or Visual Studio that adds the following features:
Compatibility with the Arduino Code structure, libraries, file naming and sketches - with the robust studio IDE.
Uploading Arduino sketches to any of the Arduino boards - and, to the APM boards.
All the files are shown in the solution panel, making it easy to open, browse or edit any file.
Take a look at the Visual Micro website for all the details.
Visual Micro has a debug feature when used with standard Arduino sketches but the APM code has removed or modified much of the standard Arduino features like Serial.print() and the hardware Serial features. The Visual Micro debugger does not work with APM. However, do not let that dissuade you from trying the Atmel Studio or Visual Studio IDE.
Here you will find a step by step process to set up Atmel Studio or Visual Studio to browse, edit, build and upload the APM code. Special thanks to Tim Leek at Visual Micro for developing this great plugin and for his help in creating this document.
Setup
Even if you are not a current user of Atmel Studio or Visual Studio Pro, but have used Arduino IDE to build the APM code, then this process will get you started. Links to other wiki pages are provided where appropriate for more detail. No detail is included for Visual Studio or Atmel Studio features. You will need to learn that on your own.
The Visual Micro website explains how to install Visual Micro for Arduino and how to set up Atmel Studio or Visual Studio to work with Arduino sketches and boards. What is not clearly covered is how to add support for the APM boards. Once that information is clear, the set up is quite simple. Here is a summary of the key steps required:
Assumptions:
The special ArduPilot Arduino must be installed and tested to build and upload the code. The complete details are here. For this example it is assumed that the installation is at C:\ArduPilot-Arduino-1.0.3-windows.
You need Atmel Studio 6.2 (free) or a licensed full version of Visual Studio Pro 2008, 2010 or 2012 installed. Visual Micro does not work with the free Express versions of Visual Studio. Visual Studio 2008 is used in this example.
You need the ArduPilot source code. For this tutorial the APM source code is assumed to be located in C:\Users\Public\Documents\ardupilot-Copter-3.1.3.
Get the latest released code zip files “Plane x.x.x” here or use Git Hub to create a clone of the current code. If you want a specific release version go to the ardupilot repository, select the desired ardupilot branch, then click download zip.
Download and install Visual Micro from the Visual Micro website and compete the setup. Instructions are at the site.
Test Visual Micro for Arduino using these instructions. Get it working before you proceed.
Download and install the APM board information. This is a key requirement to build and upload the APM code.
Go to the Apm - Installation Guide on the Visual Micro Forum. Read the post, then download the boards.txt file.
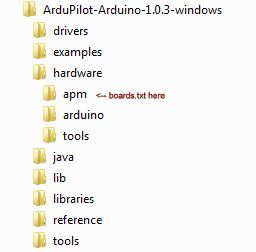
Put the file “boards.txt” into a folder “APM” within the folder “Arduino/hardware”. Regardless of where you Arduino IDE is located your Arduino folder (in this case C:\ArduPilot-Arduino-1.0.3-windows) should look like this:
- Run Atmel Studio or Visual Studio and set up for APM as follows:
(APM2 is used in this example.)
Tools>>Visual Micro>>Boards: Select Arduino Mega 2560 HAL (Apm 2)
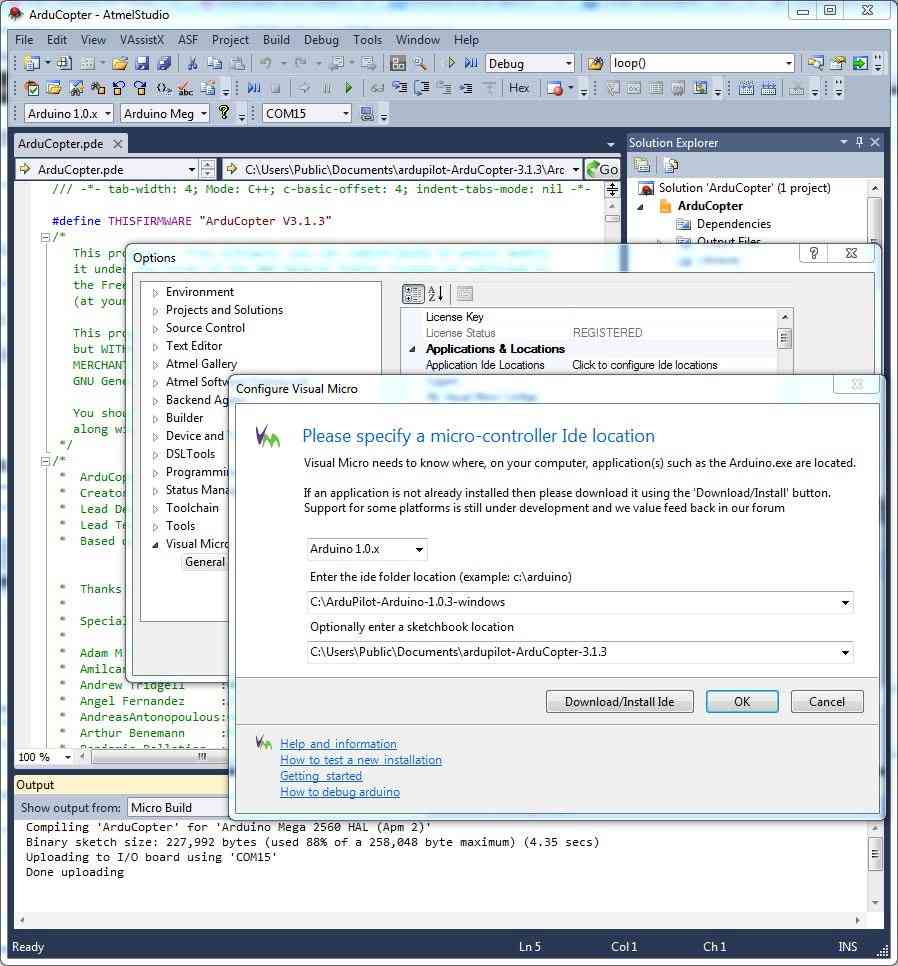
Tools>>Options>>Visual Micro: On right of window, select Applications & Locations>>Application Ide Locations>>Click to configure Ide locations: In the dialog window:
Select Arduino to “1.0.x: in the drop down text box.
Set the ide folder location to C:\ArduPilot-Arduino-1.0.3-windows (or the location of your Arduino IDE).
Set the sketchbook location to C:\Users\Public\Documents\ardupilot-Copter-3.1.3 (or the location of your ArduPilot code).
Note: This is the folder containing folders APMover2, Copter, Plane, docs, FollowMe, libraries, mk and Tools.
Here is how the setup should look for this tutorial:
Open the arducopter.pde sketch: File>>Open>>Sketch Project:
Select Copter\arducopter.pde (or arducopter.pde file in you code folder.)
Build the code: Build>>Clean Solution then Build>>Build Solution. The code should build without error. Depending on what source code your are using, you may get the message “Sketch too big …”. You can reduce the size by un-commenting some of the compile options in APM_Config.h.
Important: Each time you change a #define statement (or comment one or un-comment one) you must do Build>>Clean Solution followed by Build>>Rebuild Solution. Details are below in the Hints and Notes section.
Uploading the code
After your code builds without errors you can upload the firmware to the APM.
First do this:
Tools>>Options>>Visual Micro -Micro Debug - Advanced: Set Automatic debugging to False. Then F5 will upload without debugging - saving the need to press CTRL with F5.
Connect your APM via the USB cable.
Tools>>Visual Micro>>Serial Port. Set to the USB port detected for your APM. If the USB port is not detected, follow the Arduino installation instructions for adding the proper drivers. If the Arduino IDE works, then Visual Studio / Visual Micro should also work.
To upload to the APM board, just press F5.
The build, and upload to the APM was flight tested by the author for the code release 3.1.3. The flight modes stabilize, altitude hold and loiter were all tested and behaved the same as upload of the same revision using Mission Planner. However, be aware that building your own upload from the source can result in unexpected results. You must configure all the options defines and other code correctly. Be careful, have fun and enjoy Visual Studio with Visual Micro.
Hints and Notes
This procedure was tested to build and upload to the APM on the authors PC. There are other ways to configure Arduino, Atmel Studio, Visual Studio, and Visual Micro. Those methods are left to the reader. For instance, you can install the ArduPilot Arduino IDE in any location, not just in the Programs area. It is suggested to use this process first to verify everything works.
Ways to reduce the size of Copter so it will build: In Visual Studio or Atmel Studio solution panel (where the source files are listed), open the file Copter/Header Files/APM_Config.h and un-comment some of the #Define XXX DISABLED lines to save some space. I.E. disable MOUNT, OPTFLOW, CAMERA,CONFIG_SONAR and/or PARACHUTE as appropriate for your APM. Each time you change a define you must do Build>>Clean Solution followed by Build>>Rebuild Solution.
Errors building from fresh source clone: The first time you set the application location (for instance after getting a fresh clone of the source) or change the IDE you are using, you may get build errors even though you have selected the correct Arduino board. To get an error free build, just re-select the correct board. See Multiple installs of Arduino below for one reason this may occur.
Fast compile vs changing defines: Visual Micro has a default option for fast compiles. This is setup as the default. The IDE checks for changes to files and if there are no changes, does not recompile unchanged files. This really great feature has a side effect when define statements are changed because they effect other files but do not specifically change the text (code) thus files effected by defines will not be recompiled causing a real mess. There are two ways to avoid this issue:
Each and every time you change a define or un-comment a define or comment a define do this:
Build>>Clean>>Solution (That will clean out the pre-compiled cache)
Build>>Rebuild
All following builds (assuming no changes to defines) can be the really fast version Build>>Build Solution
Or, if you like to wait a long time for each compile you can change the Visual Micro options
Tools>>Options. Select Visual Micro. scroll down to Compiler Optimisation. Hey, in UK they spell it that way.
Set Core Modified and Library Modified to False
Multiple installs of Arduino: It is important to note that Arduino has only one location where the parameters are stored - in C:\Users\….\AppData\Roaming\Arduino\preferences.txt. Any time you start any installation of Arduino - a standard version, the ArduPilot Arduino version or even changing settings in Visual Micro - that file may get changed. So, it is very important to check all the settings in the IDE you are using each time you change the IDE - to avoid having the preferences set to that of the last IDE you used.
Referencing a standard Arduino in Visual Micro: Normally, Visual Micro is setup to reference a standard installation of Arduino instead of the special ArduPilot Ardunio for the HAL versions of APM. You can configure Visual Studio or Atmel Studio to reference a standard installation and it may build and upload the APM code but that upload will not work. The build size is different and it does not connect to Mission Planner. It is strongly suggested you only reference the special ArduPilot Arduino installation when working with APM code.
Using Arduino statements and libraries: This is better stated as not using standard Arduino statements. The newer HAL versions of ArduPilot for the APM boards removed most, if not all, of the standard Arduino statements and libraries. You can not just add an analogRead(sensorPin) statement for instance. So, do not be frustrated if you try to use the standard Arduino language reference to edit the APM code - it will mostly not work. There are equivalent calls and statements for the APM but you will have to search for examples in the code.
Building Older Versions of ArduPilot: If you are still working with version 2.9.1b or possibly older versions prior to HAL, you can take advantage of the Atmel Studio or Visual Studio and Visual Micro IDE.
You just need to do the following:
Download the version of ArduPilot Arduino that supports the 2.x.x revisions. Don’t confuse this with the current version. They have the same name but are different.
Install the ArduPilot Arduino in a separate folder, and add the apm/boards.txt file into the hardware folder - like the above instructions.
In Atmel (or Visual) Studio, in Tools>>Options>>Visual Micro, set the Applications and Arduino locations to reference the ArduPilot Arduino that supports the 2.x.x revisions, and to the folder containing the 2.x.x source code. You can get the 2.9.1b code at the diydrones/ardupilot repository, select the desired ardupilot branch, then click download zip.
Set Tools>>Visual Micro>>Boards to APM Arduino Mega 2560.