Building for Bebop on Linux
These instructions clarify how to build ArduPilot for the Bebop flight controller board on a Linux machine. More details on the Bebop can be found here.
Tip
The instructions for running ArduPilot on Bebop 2 can be found here.
Warning
Making the changes described in this article will void your warranty! Parrot’s technical support will not help you with this hack or to recover your original software.
Warning
Hacking a commercial product is risky! This software is still evolving, and you may well find issues with the vehicle ranging from poor flight to complete software freeze.
That said, it is almost always possible to recover a drone and members of the ardupilot dev team can likely help people hacking or recovering their Bebop on this google group.
Upgrading the firmware
As of Nov 2015, the Bebop ships with a version of Linux that cannot run ArduPilot and must be upgraded. In order to upgrade it, you will need to download a custom version here.
In order to upgrade to this version:
Power up your Bebop
Connect to its Wi-Fi network (BebopDrone-XXXX)
Connect to it via ftp
ftp 192.168.42.1
go to the eMMC directory
cd internal_000
Upload the update file
put bebopdrone_update.plf
Connect to the Bebop by telnet
telnet 192.168.42.1
Note
A telnet error here indicates the Bebop’s current firmware does not have the correct port open. Manually reboot the Bebop to complete the update.
Sync and reboot
sync
reboot
Wait for the Bebop to perform the update (this could take several minutes)
Note
Don’t shutdown your Bebop during this time
When the update is complete you can connect again via Wi-Fi and telnet and verify the update by checking the software version indicates 0.0.0 (not an official release)
cat version.txt
Build ArduCopter for Bebop
Tip
You can skip this step if you just want to try out the (experimental) binary version.
The following steps show how to build a custom version of the Copter software for Bebop:
Install armhf toolchain
Install Parrot’s version of linaro arm-linux-gnueabihf toolchain that can be downloaded from here
Install it (the toolchain will be extracted in /opt)
sudo dpkg -i parrot-tools-linuxgnutools-2016.02-linaro_1.0.0-2_amd64.deb
Add the path to the toolchain to the PATH variable
export PATH=/opt/arm-2016.02-linaro/bin:$PATH
Download and compile ArduCopter
Clone ardupilot repository
git clone --recurse-submodules https://github.com/ArduPilot/ardupilot.git
cd ardupilot
Building the flight control firmware is nearly identical for building for the Pixhawk except the build command is:
./waf configure --board=bebop --static
./waf build
Strip the binary to reduce the memory footprint:
arm-linux-gnueabihf-strip ArduCopter.elf -o arducopter
Uploading the firmware
If you haven’t built the firmware as described in the previous steps you can download a binary version here
Connect again by ftp and go to the eMMC directory
Put the arducopter binary
put arducopter
Connect to the Bebop via telnet
Copy arducopter to /usr/bin and change permissions
cp /data/ftp/internal_000/arducopter /usr/bin
chmod +x /usr/bin/arducopter
Starting ArduPilot
Connect via telnet
Kill the regular autopilot
kkLaunch Copter
arducopter -A udp:192.168.42.255:14550:bcast -B /dev/ttyPA1 -C udp:192.168.42.255:14551:bcast -l /data/ftp/internal_000/APM/logs -t /data/ftp/internal_000/APM/terrain
Changing the GPS configuration
In order to get Bebop’s GPS to send the NMEA frames that APM’s NMEA driver understands, you need to change its configuration. To achieve this you will need to stop the in-build autopilot as described previously (and don’t launch Copter yet):
Download the gps_config file here
Connect to the Bebop via ftp and go to the eMMC directory as indicated in the “Upgrading the firmware” section above
Put the config file
put gps_config.txt
Connect to the Bebop via telnet
Copy gps_config.txt in /etc/
cp /data/ftp/internal_000/gps_config.txt /etc/
Launch the GPS config updater
libgps_cliWait for NMEA messages to be displayed in the console
Stop libgps_cli by typing Ctrl-C
Launch Copter at startup
It is a lot more convenient to automatically execute Copter startup than connect and do this manually. In order to do so, the startup scripts need to be hacked in the following way.
Warning
This part is critical since you have to edit the startup script. If you do something wrong here, you could end up with a Bebop that can no longer boot properly. If this happens you will have to get a UART cable to recover.
The startup script is located at /etc/init.d/rcS. You will need to edit it to remove the lines launching the regular autopilot and replace them by launching Copter. The line in question is the following:
DragonStarter.sh -out2null &
Replace this with:
arducopter -A udp:192.168.42.255:14550:bcast -B /dev/ttyPA1 -C udp:192.168.42.255:14551:bcast -l /data/ftp/internal_000/APM/logs -t data/ftp/internal_000/APM/terrain &
In order to avoid editing the file manually, download this rcS file.
Make a copy of the original rcS file for recovery purpose
cp /etc/init.d/rcS /etc/rcS_backup
Connect to the Bebop via ftp and put the rcS file in the eMMC as described before for the other files.
Then copy it manually to overwrite /etc/init.d/rcS and change permissions
cp /data/ftp/internal_000/rcS /etc/init.d/rcS
chmod +x /etc/init.d/rcS
Sync and reboot
sync
reboot
In case you want to put your Bebop back to normal and use the normal autopilot and app again, just replace /etc/init.d/rcS with the backup file, sync and reboot
cp /etc/rcS_backup /etc/init.d/rcS
sync
reboot
Note
If you put your software back to normal and use your Bebop with FreeFlight smartphone App, you might be asked to upgrade your software version. If you do so, you will have to repeat some of the previous steps, at least for the GPS config, copying arducopter and modifying the init scripts. Regarding the need to upgrade to a custom version, it will depend on whether some options will or won’t be available in the following release. Information to follow…
Recovery
In case something went wrong and you are not able to boot your Bebop anymore
The UART port is located under the Bebop’s neck on the right side (facing the front camera)
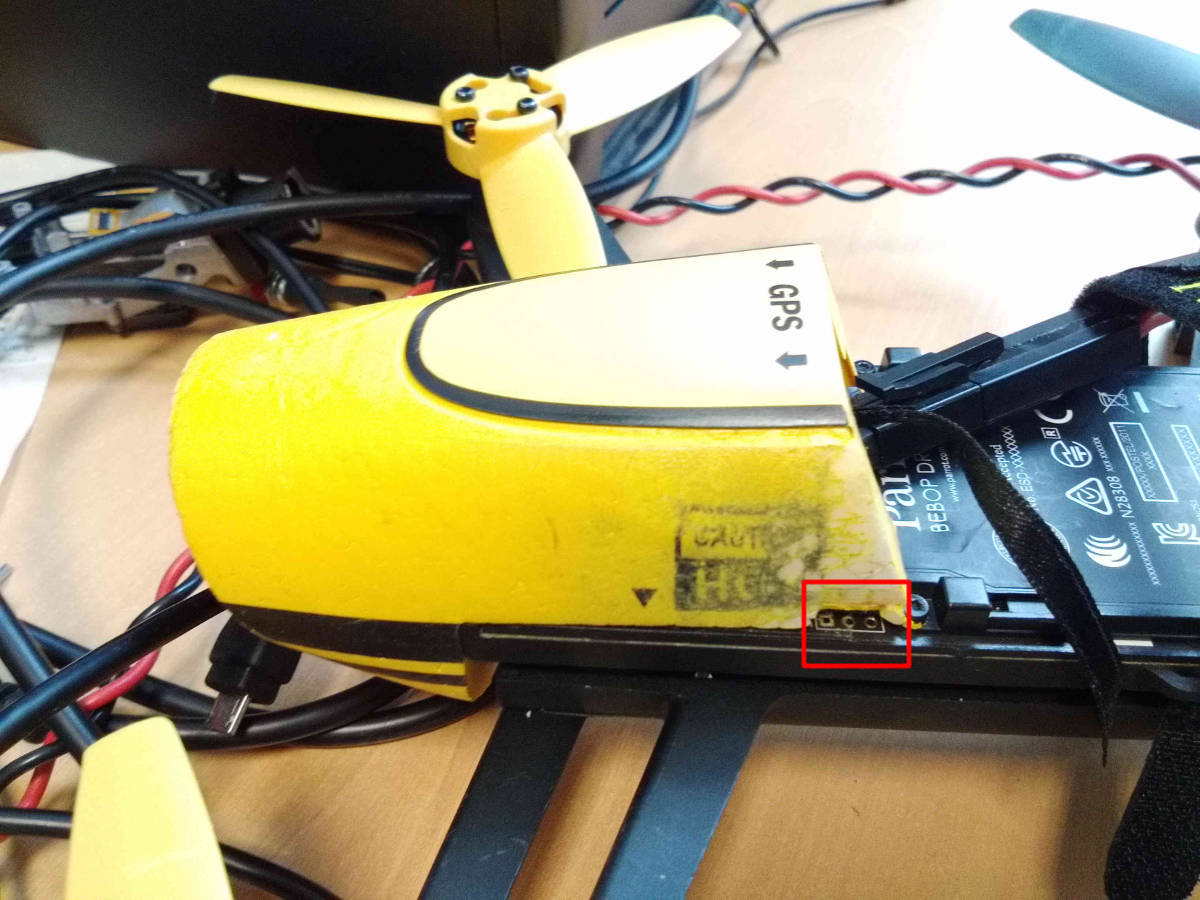
You will have to pull back the polystyrene a bit but it shouldn’t cause much damage
Get a UART cable like this one or any FTDI 3 pin cable (GND TXD RXD)
Get headers like these ones and plug them into the cable like this:
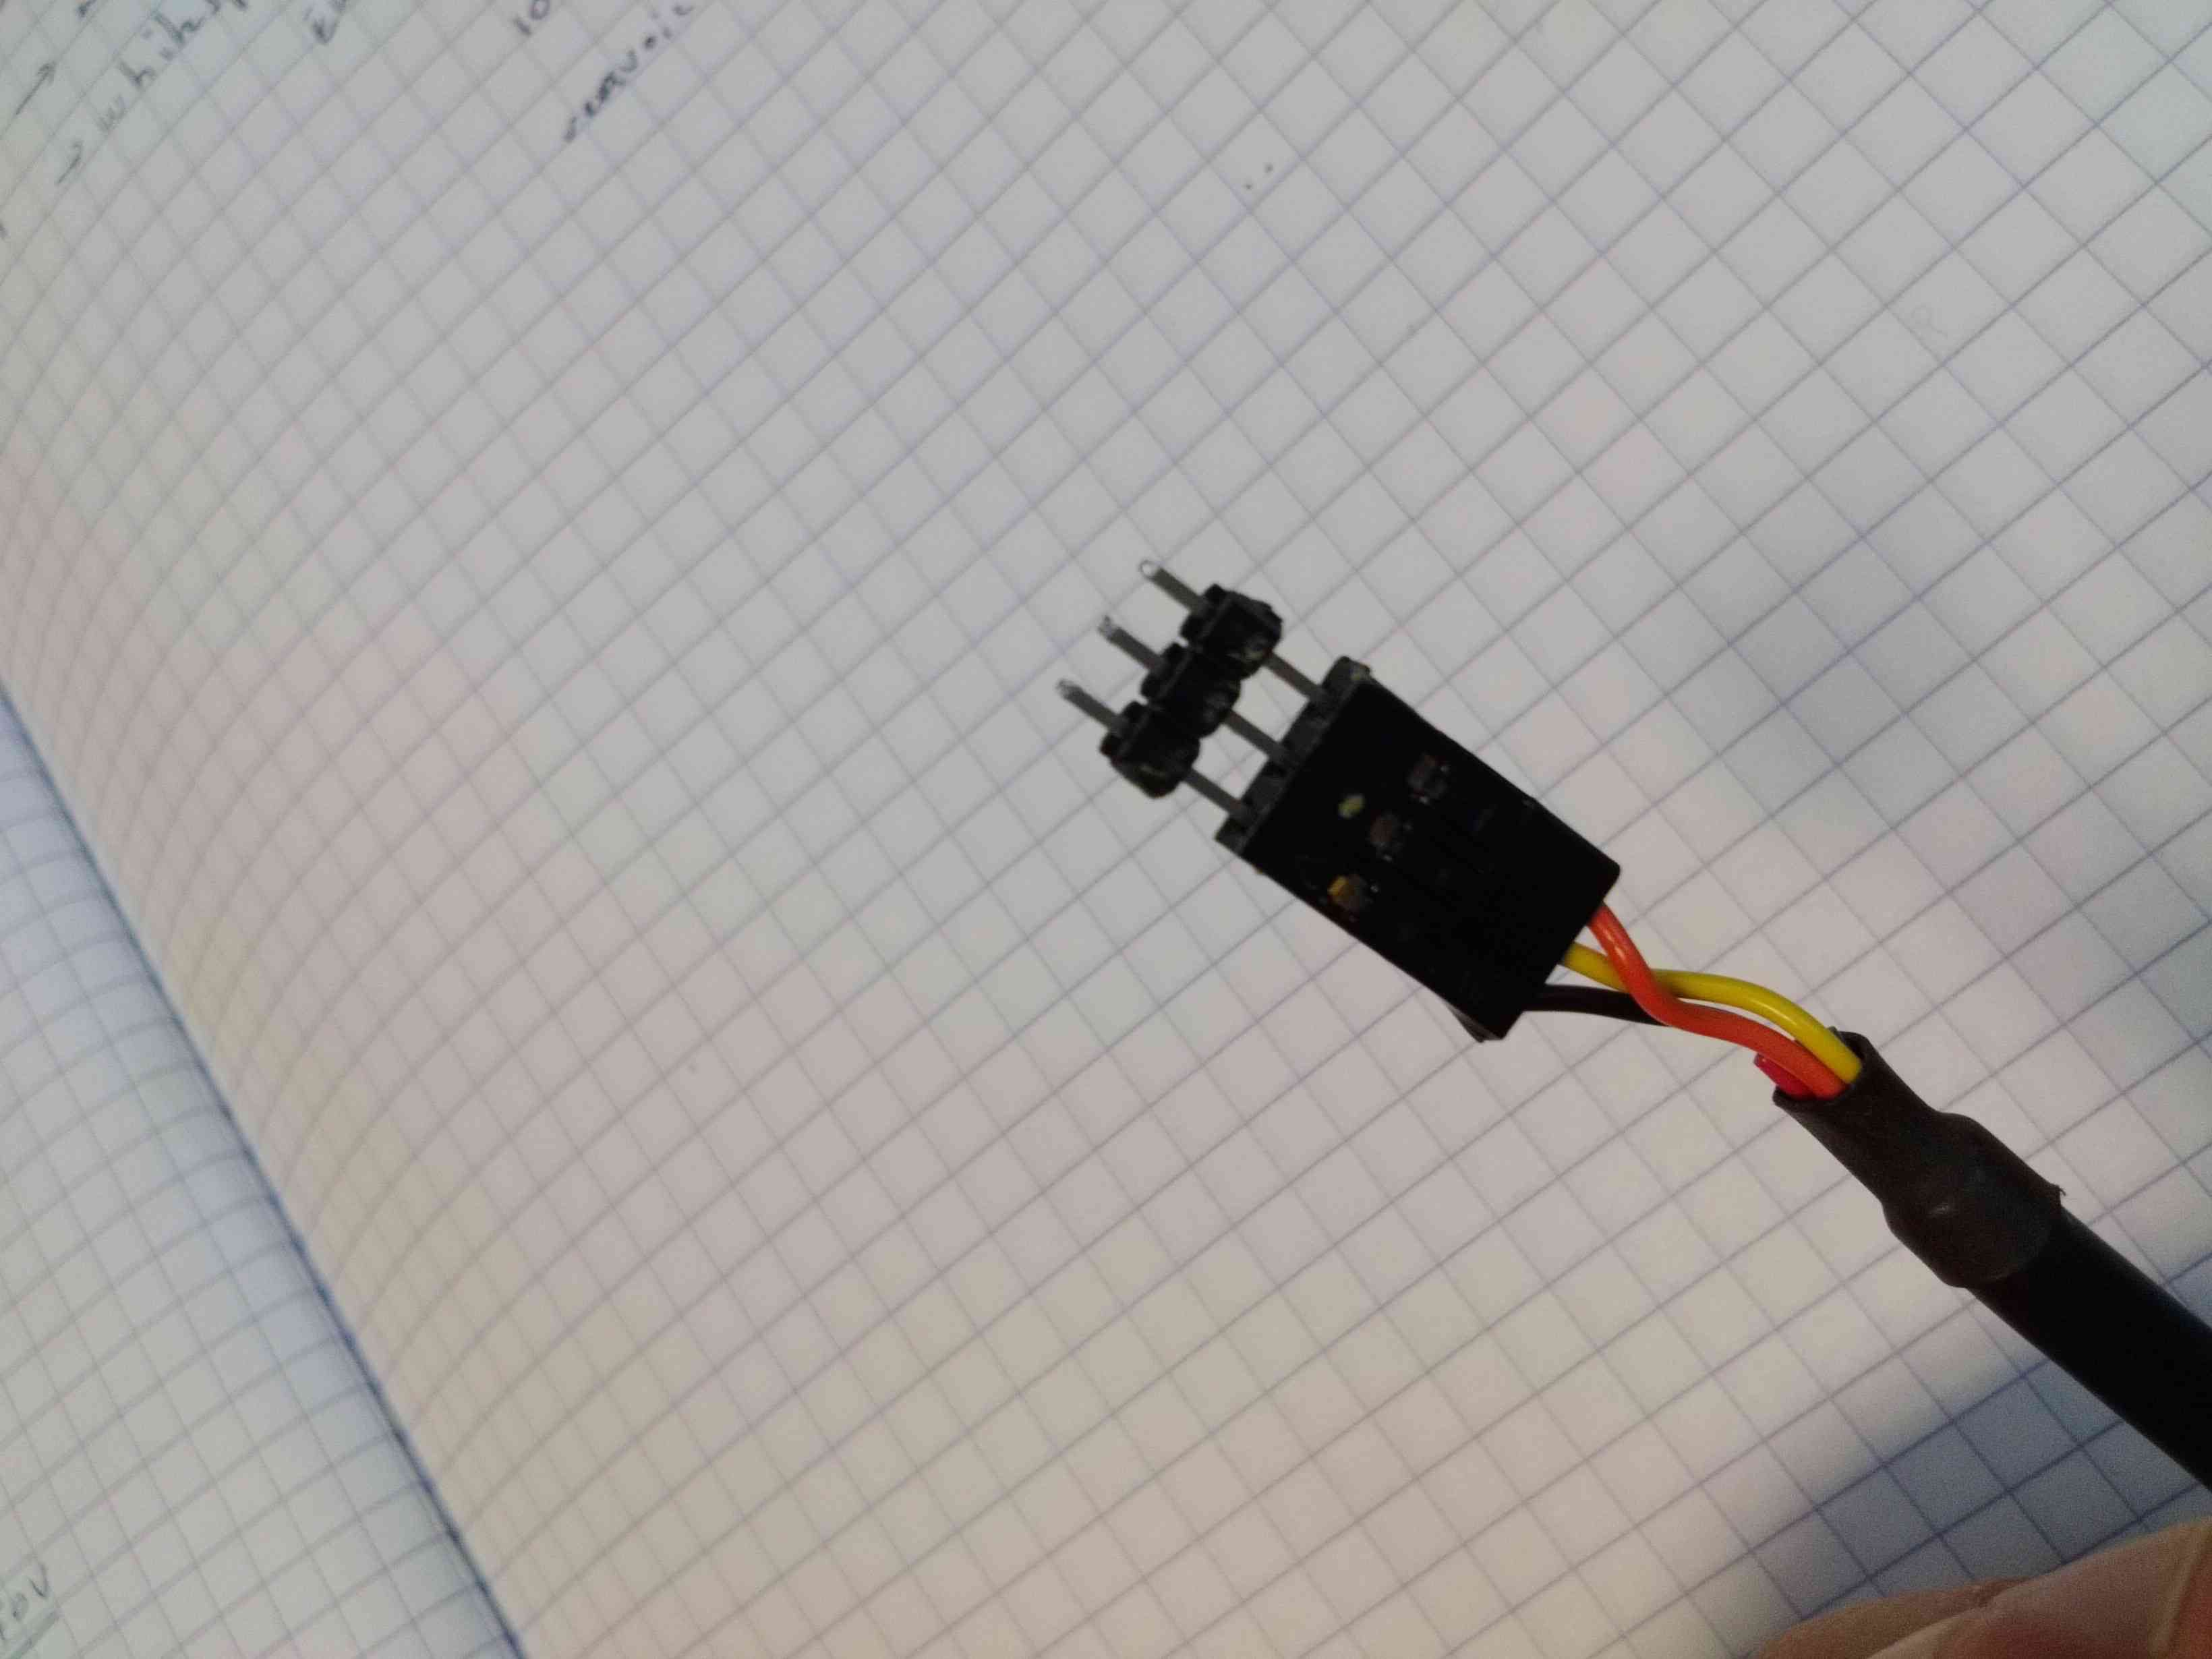
Note
The color codes for the cable are usually:
black = GND
yellow = RXD
orange = TXD
Plug the cable into the Bebop like this:

Note
Be careful about the pinout:
black: front
yellow: middle
orange: back
Install a UART terminal emulator like minicom and connect to a Bebop once it is powered up
Copy the backup rcS file back to its original place, sync and reboot:
mount -o remount,rw /
cp /etc/rcS_backup /etc/init.d/rcS
sync
reboot
Flying
FreeFlight 3 is not compatible with ArduPilot and you will therefore have to use one of the supported GCS. Connect to the Bebop via Wi-Fi and just start your GCS, it should connect automatically if you setup the link to UDP (in case it is needed).
The SkyController is not compatible with apm with its regular firmware. You would need to flash an alternative version in order to be able to control your Bebop with it (information about that is coming soon…).
In order to pilot the Bebop manually, Mission Planner GCS users can use a gamepad as described here. Alternatively use the RCOutput UDP interface on port 777 on the Bebop, with a Linux PC (or board type Raspberry Pi) and a USB gamepad.
Controlling the Bebop via RC over UDP on Linux
In order to control the arducopter for Bebop via RC over UDP, you can either write an application using this protocol and sending a packet every 10ms
Or use joystick_remote Linux application
In order to do so, clone the git repository:
git clone https://github.com/jberaud/joystick_remote.git
Build it
cd joystick_remote
make
Plug a USB gamepad (the list of supported gamepads is explained if you type joystick_remote –help)
In case your gamepad is not supported you can easily add support for it if you know its mapping
Connect to the Bebop via Wi-FI and launch the application:
./joystick_remote -d /dev/input/js[X] -t [gamepad] -r 192.168.42.1:777
where [X] is the device number of your joystick that you can easily find, usually 0 but sometimes 1 if your laptop already includes an input device like an accelerometer and [gamepad] is one of the supported gamepads.
so for an XBox 360 gamepad mapped on /dev/input/js0 the command line becomes
./joystick_remote -d/dev/input/js0 -t xbox_360 -r 192.168.42.1:777
The flight modes have to be set in Copter’s parameters in order to use the buttons to set the flight modes
Basic configuration and frame parameters
In order to do the basic configuration and calibration, you can use any of the GCSs and perform
Magnetometer Calibration
RC Calibration
Accelerometer Calibration
Thanks to Leonard Hall, we have a very good set of tuning parameters that you can find here
Known limitations
The GPS of the Bebop isn’t very good compared to a UBlox GPS and therefore the Bebop drifts significantly in Loiter, PosHold and other GPS modes
Mission run in Auto mode work reasonably well but we recommend you takeoff and land in a non-GPS mode such as AltHold or Stabilize.
Some work will be done to improve support for this GPS
The optical flow is currently under development
There is currently no support for video streaming and capture