ARCHIVED see Setting up the Build Environment on Windows 10 using WSL
Setting up the Build Environment on Windows 10/11 using WSL1 or WSL2
These setup instructions describe how to set up “Windows Subsystem for Linux” which allows building with waf.
It involves enabling the built-in Windows Linux environment (WSL) in Windows, installing a compatible Linux distribution, and finally installing the ArduPilot build environment as if it were a normal Linux system.
Upon completion, you will be able to build ArduPilot binaries and run the native ArduPilot SITL simulator, including the MAVProxy developer Ground Control Station. You will also be able to use the majority of Linux development features such as debugging
WSL Setup Steps
The official instructions are here but the steps are also listed below.
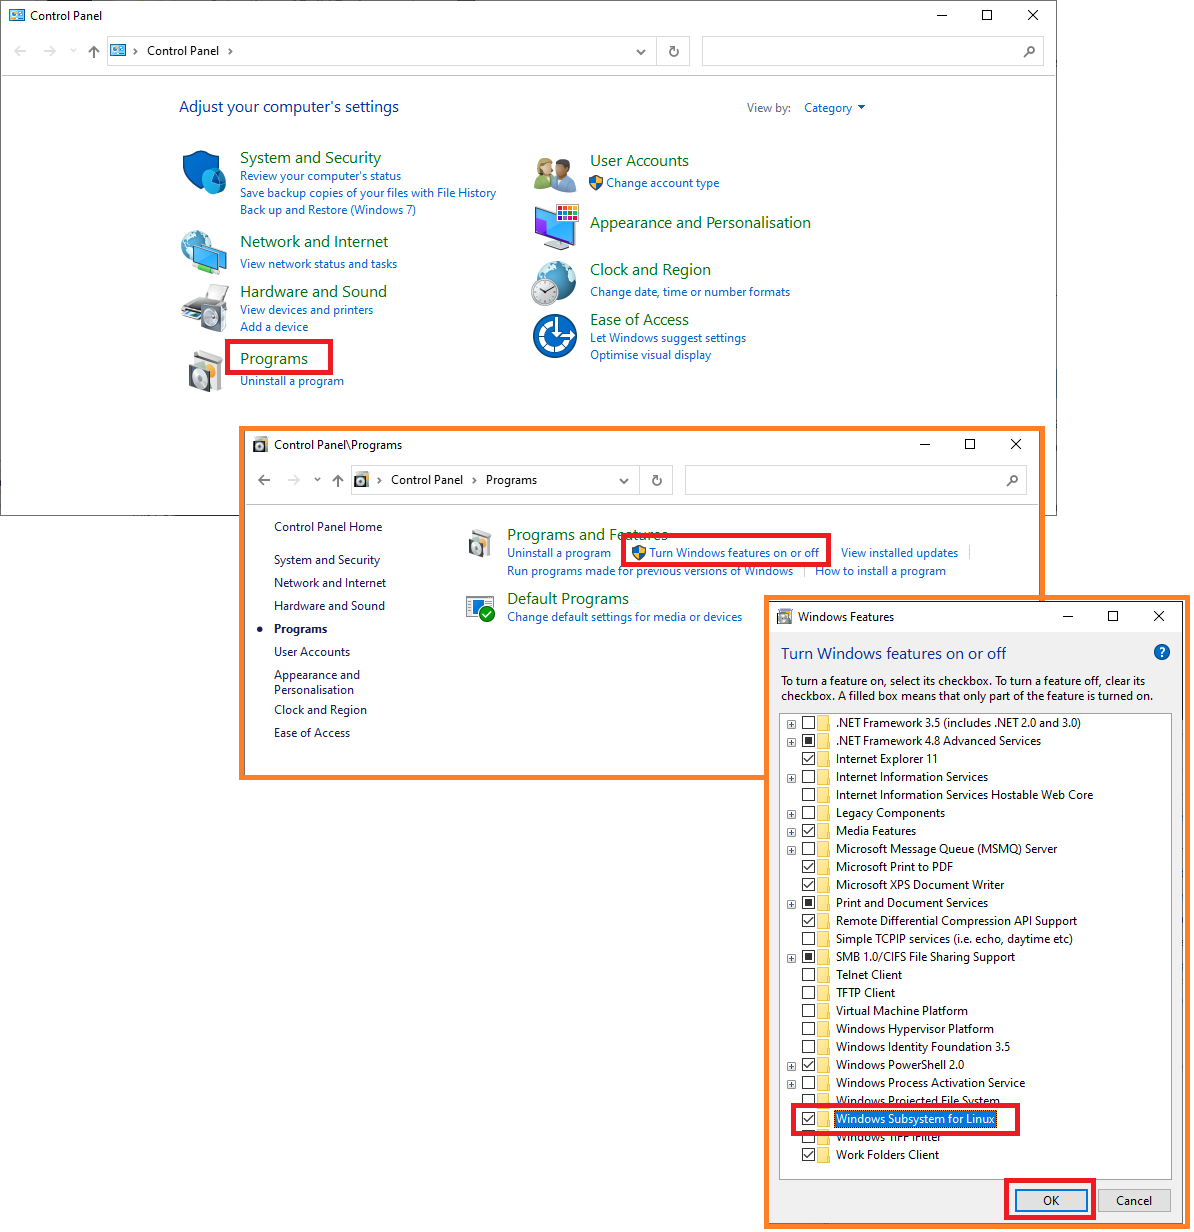
Enable WSL by opening “Control Panel”, “Programs”, “Turn Windows features on or off”, selecting “Windows Subsystem for Linux”, and press OK.
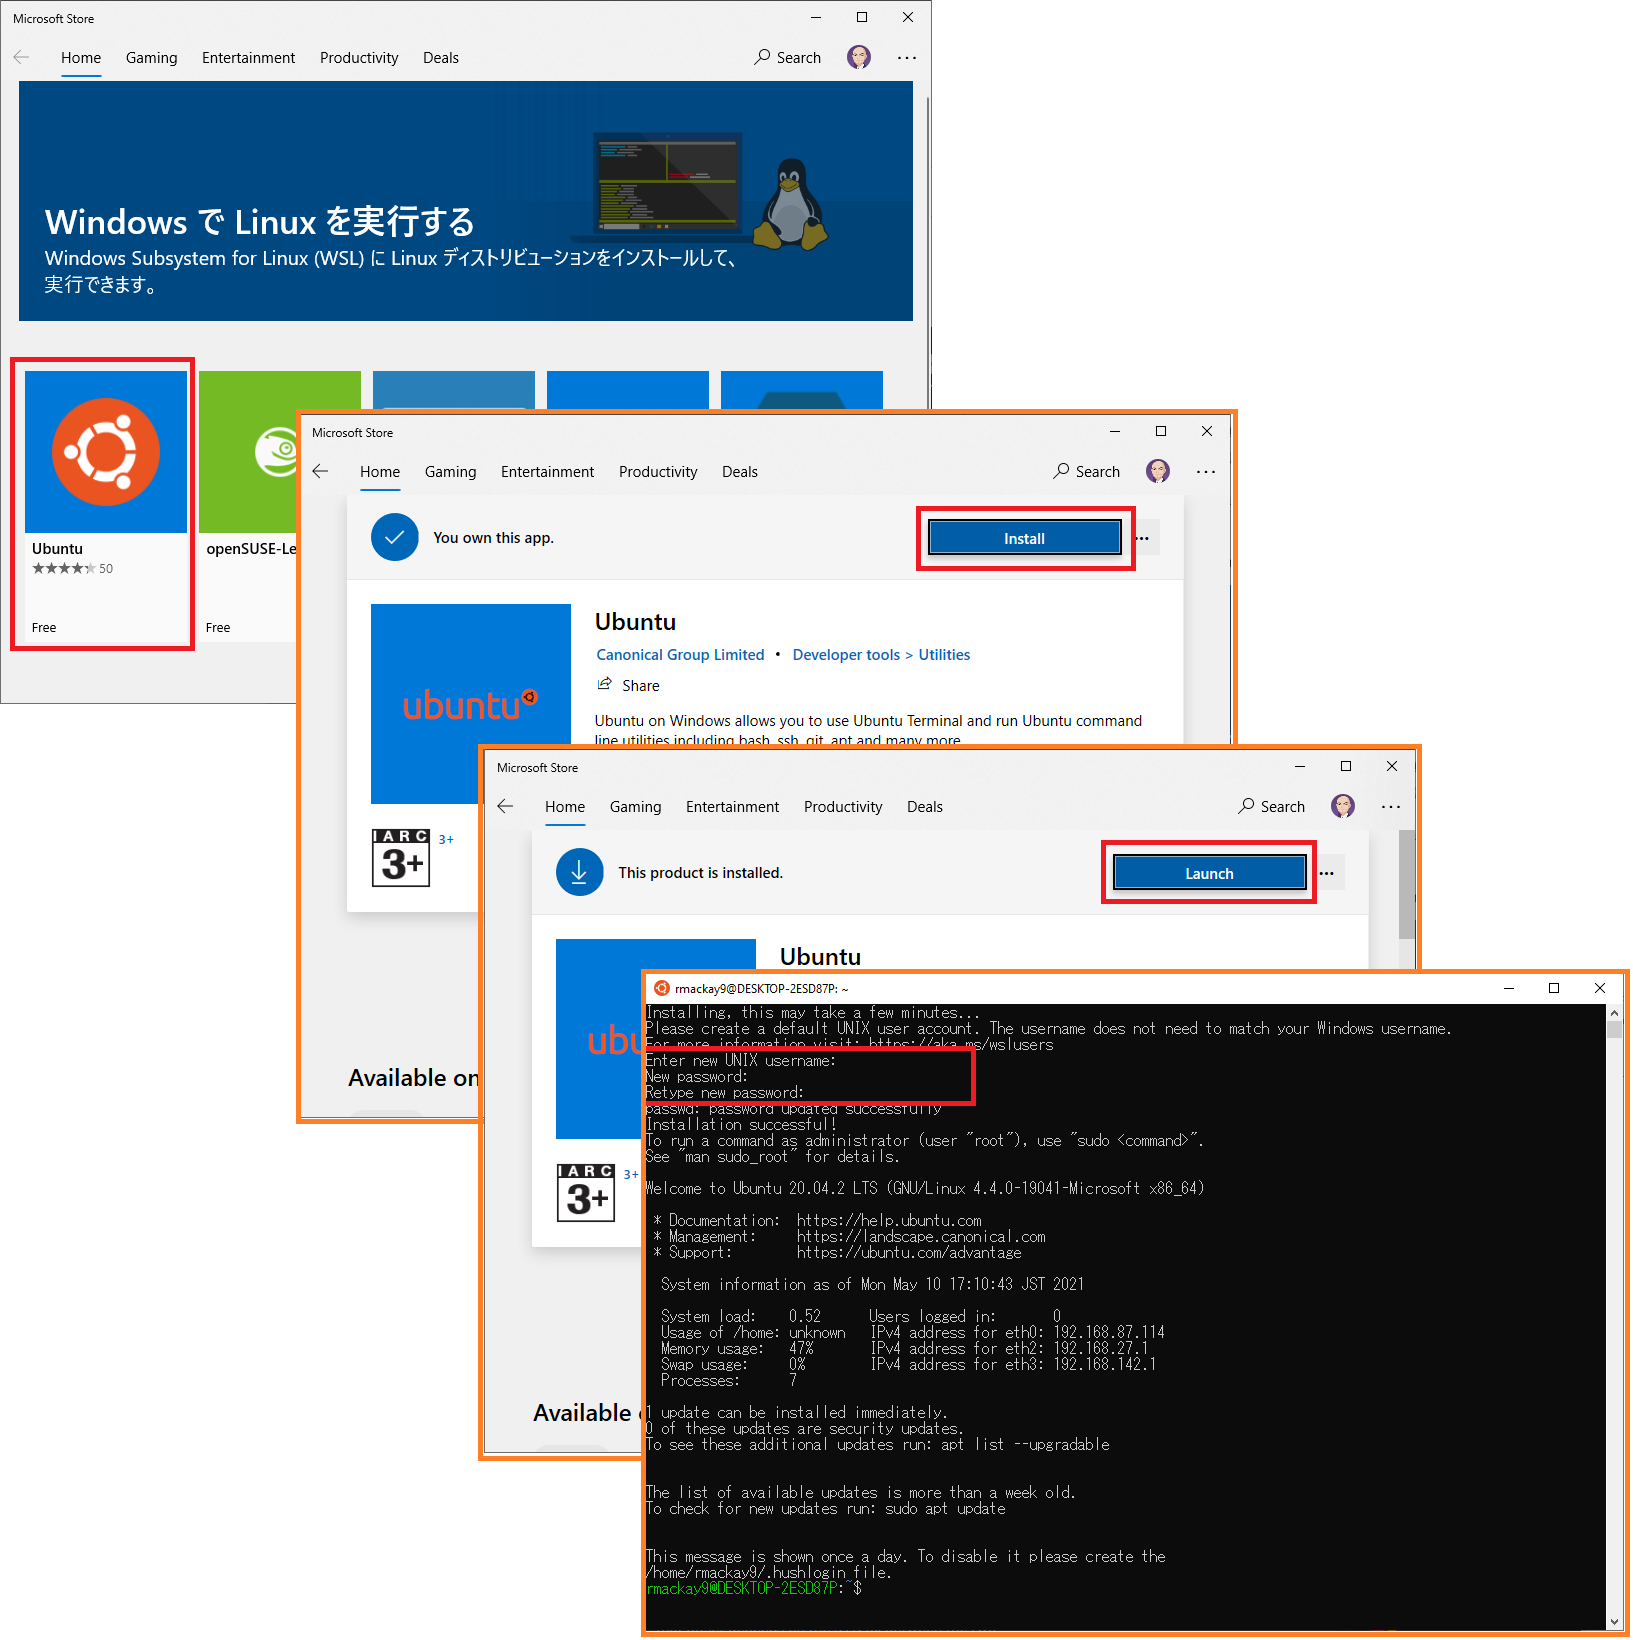
From a web browser open https://aka.ms/wslstore which should open the Microsoft store to allow installing Ubuntu. Then Launch Ubuntu and fill in a username and login
From the Start menu, start the “Ubuntu” application and then follow the Ubuntu instructions to install ArduPilot development environment
Note
Compilation speeds will be much faster if the ArduPilot repository is downloaded inside of WSL’s file system and not externally in the normal Windows file structure.
To reload the path variables in WSL either close the terminal and reopen it or use:
logout
If using Windows 10 install an XWindows application to run graphical programs such as SITL by installing VcXsrv, Cygwin X or Xming on Windows. For Winodws 11 this is not necessary.
If desired, change default WSL parameters as described at this link. These parameters allow you to set for example the amount of memory and number of processors used by WSL.
Note
It is recommended to set memory limits as WSL2 currently does not release memory back to Windows properly.
Create or edit the file at the following location according to your needs and system specifications,
C:\Users\<yourUserName>\.wslconfig
[wsl2]
memory=8GB # Limits VM memory in WSL to 8 GB
processors=16 # Makes the WSL 2 VM use 8 virtual processors
swap=8GB
WSL1 vs WSL2
WSL2 is the latest version of the Windows10 Subsystem for Linux. It is many times faster than WSL1 and is therefore preferred for building the code in terms of compilation speed. It can also run MAVProxy and native SITL. However, it does not support the following yet:
USB: uploading code or connecting to the autopilot is not possible (Not possible by default)
Running Realflight on the same or a remote PC
If these features are needed, WSL1 might be preferable.
Once installed, you can switch between WSL1 or WSL2 versions as you prefer using PowerShell.
wsl --list --verbose
wsl --set-version Ubuntu 1
wsl --set-version Ubuntu 2
Uploading to a board using WSL2
Uploading to boards (e.g. ./waf plane --upload) in WSL2 is possible; however, an installation of Python must exist on the Windows side. Install these packages in Windows Python.
pip.exe install empy pyserial
As of July 2022, Microsoft’s solution of providing USB access to WSL2 via usbipd does not work for accessing the bootloader on the device due to slow mounting times.
Note
WSL1 can upload to boards by default with no additional changes. This is due to differences in how USB devices are handled.
Using SITL with WSL and XWindows (Windows 10 only)
Windows 11 has a built-in XServer that is automatically set up. This section can be skipped if you are using Windows 11.
When using SITL (e.g. Tools/autotest/sim_vehicle.py) with default options or --console --map an installed XWindows application must be started first. If not, the following error message will appear when running:
[Errno 111] Connection refused sleeping
Open the “Ubuntu” application and add the following to the end of ~/.bashrc. Be sure to comment and uncomment the appropriate lines depending on if you are using WSL1 or WSL2.
# Export Display for XWindows
# For WLS1
# export DISPLAY=0:0
# For WSL2
export DISPLAY=$(grep -m 1 nameserver /etc/resolv.conf | awk '{print $2}'):0
Using VcXsrv to Create XWindows Displays
Select display settings: “Multiple Windows” but it is your preference
Select how to start clients: Must select “Start no Client”
Extra settings: Must check “Disable access control”
Note
- If you have an issue with display check the following firewall rules,
Go to
Windows Defender Firewalland clickAdvanced Settings(opensWindows Defender Firewall with Advanced Security)Under
Inbound RulesfindVcXsrv windows xserverand ensureAllow Connectionis enabled for your network typePrivate,Public, or bothCheck
Outbound Rulesas well
Note
this step is not required in Win11 since it already itegrates the grahical interface into its WSL2 environment.
Code Editing in WSL Using VSCode (Optional)
VSCode can be installed on the Windows machine to edit and compile files inside of WSL. VSCode automatically integrates upon installation with WSL. More details are available here.
Do not install VSCode inside of WSL using, for example, apt-get.
Be sure that the folder you are working on is opened within the WSL remote. This can be achieved by clicking the green button in the bottom left corner.
Windows Terminal (Optional)
Windows Terminal enables multiple tabs that can switch between many Linux terminals, PowerShell, and more. Directions to install Windows Terminal are here.
You can change the default terminal when opening Windows Terminal by going to “Settings” and moving the Ubuntu section to be first in the
listsection of thesettings.jsonfile.The default starting directory can be changed by adding the
startingDirectoryline below to your preferred location by following the example below.Note a similar code block to the one shown below will be automatically generated based upon the version and distribution of Linux installed.
{
    "guid": "{07b52e3e-de2c-5db4-bd2d-ba144ed6c273}",
    "hidden": false,
    "name": "Ubuntu-20.04",
    "source": "Windows.Terminal.Wsl",
    "startingDirectory" : "//wsl$/Ubuntu-20.04/home/<yourUserName>/ardupilot"
},
Git Integration with Windows Credential Manager (Optional)
Git’s Credential Manager can be connected to Window’s Credential Manager tokens. This connection prevents re-authentication requests when accessing remote repositories such as GitHub after closing WSL or restarting Windows. The first time a Git operation requires credentials a dialog box will appear automatically to enter your credentials. See this guide for more information regarding GIT and WSL.
git config --global credential.helper "/mnt/c/Program\ Files/Git/mingw64/libexec/git-core/git-credential-manager.exe"
File System Access between WSL and Windows
From within WSL, the Windows drives are referenced in the /mnt directory. For example, to list documents within your (<username>) documents folder: ls /mnt/c/'Documents and Settings'/<username>/Documents or ls /mnt/c/Users/<username>/Documents. You can also use the command explorer.exe . to open a Windows file explorer window in the current Linux directory. Take care that the editor being used on the Windows side does not change the line endings. Corruption of files is possible if care is not taken when crossing between file systems. In Windows 11, the Linux file manager ‘nautilus’ or Windows ‘explorer.exe’ can be invoked from the command line.
From within Windows 10, the WSL distribution’s files are located at (type in windows Explorer address bar): \\wsl$\<distribution name> (e.g. \\wsl$\Ubuntu-20.04). Within Windows 11, the files are accessible under the Ubuntu directory in file explorer. Be careful modifying WSL text files in Windows editors since line endings are different in the two file systems.
Note
When trying to run your Ground Control Station software on WSL, if the application returns an error “fuse: device not found, try ‘modprobe fuse’ first” then it will be better to either use MAVProxy or MissionPlanner as your default ground control station because WSL does not support fuse (for more information check : https://github.com/Microsoft/WSL/issues/17 ). As of now, this error has been seen while using QGroundControl on WSL running Ubuntu 16.04.