Plane SITL/MAVProxy Tutorial
This tutorial provides a basic walk-through of how to use SITL and MAVProxy for Plane testing.
Overview
The article is intended primarily for developers who want to test new
Plane builds and bug fixes using SITL and MAVProxy. It shows how to
take off, run missions, fly in GUIDED mode, set a geofence, and
perform a number of other basic testing tasks.
The tutorial is complementary to the topic Using SITL for ArduPilot Testing.
Note
We use MAVProxy here, but you can attach another ground station to SITL if you prefer (similar instructions can be used in any GCS).
This tutorial is for Plane - see Copter and Rover for similar tutorials on the other vehicles.
Preconditions
The tutorial assumes you have already set up SITL on Windows or
Linux and that you have started SITL
using the --map and --console options:
cd ~/ardupilot/ArduPlane
sim_vehicle.py --map --console
Note
If you wish to start the simulation at a different map location or use a different frame type (-f option for quadplane,firefly,etc.) than a standard aileron/elevator/rudder/throttle plane, see SITL Advance Testing. A complete list of startup options for the simulator can be found using the –help option:
sim_vehicle.py --help
The MAVProxy Command Prompt, Console and Map should be arranged conveniently so you can observe the status and send commands at the same time.
Taking off
To take off with Plane you can use a mission (AUTO mode) that contains the MAV_CMD_NAV_TAKEOFF command, or use the TAKEOFF mode. If it’s a quadplane, you can also takeoff in a VTOL mode such as QLOITER, QHOVER, or QSTABILIZE, by raising the throttle above mid-stick (using normal defaults, RC 3 1600 command for example). Once you are airborne you can switch to other flight modes (be sure your throttle is set at an appropriate value for that mode).
First load the CMAC-circuit.txt test mission using the wp load
command as shown below (this mission contains the takeoff command):
wp load ..\Tools\autotest\Generic_Missions\CMAC-circuit.txt
wp list
Once the mission is loaded you can take off by arming the throttle and
setting the mode to AUTO (the order of these operations does not
matter):
mode auto
arm throttle
The plane should take off to an altitude of 40 metres and then proceed through the other mission waypoints (most of which have an altitude of 100m). You can stop/pause the mission at any time by changing the mode.
Monitoring
During takeoff you can watch the altitude increase on the console in the Alt field.
Developers may find it useful to graph the takeoff by first entering
the gtakeoff command.

MAVProxy: PlaneTakeoff Graph (gtakeoff)
Troubleshooting
The most common sources of difficulty taking off are:
Using a mission that does not contain a takeoff command!
Attempting to takeoff when the vehicle is not armed. This can happen if the vehicle fails pre-arm checks.
You can list all enabled checks using the command arm list:
LAND> arm list
LAND> all
params
voltage
compass
battery
ins
rc
baro
gps
You can enable and disable checks using arm check n and
arm uncheck n respectively, where n is the name of the check. Use
n value of all to enables/disable all checks.
Flying a mission
You can load a mission at any time using the wp load command. The
mission will start as soon as the vehicle is armed and you’re in
AUTO mode.
The example below shows how to load and start one of the test missions,
skip to the second waypoint using wp set n, and loop the mission:
wp load ..\Tools\autotest\Generic_Missions\CMAC-circuit.txt
mode auto
wp set 2
wp loop
The MAVProxy Waypoints documentation lists the full set of available commands (or you can get them using auto-completion by typing “wp” on the command line).
If you want to create a waypoint mission, this is most easily done on the map:
Right-click on the map and then select Mission | Draw.
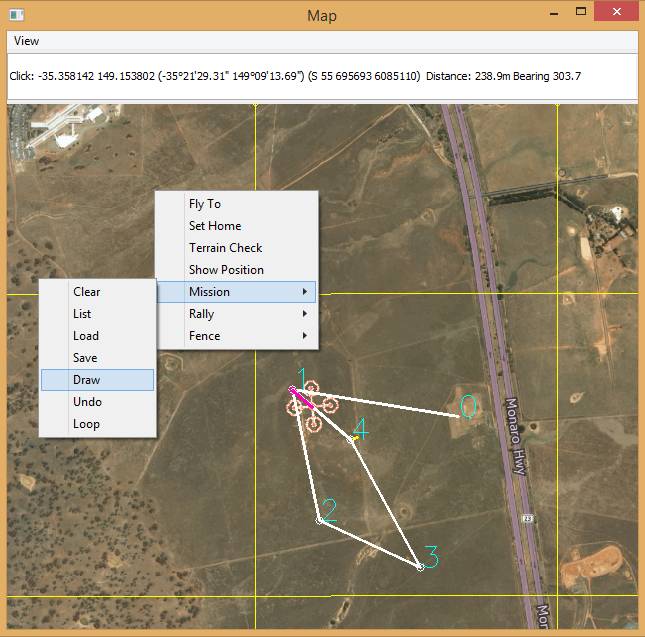
MAVProxy: Draw Mission Menu
Left-click on the map where you want the points to appear.
Note
Nothing visible will happen when you make the first click. After the second click, lines will join your points to show the path.
When you’re done, you can loop the mission by right-clicking on the map and selecting Mission | Loop.
This approach only allows you to create
MAV_CMD_NAV_WAYPOINT
commands. You can edit missions and use other commands on Linux using
the misseditor module (module load misseditor). This is currently
broken on Windows. It is also possible to load other types of commands
from files.
Changing flight modes
Plane supports a number of flight modes, which
you can list in MAVProxy using the mode command:
AUTO> mode
(AUTO> ''LAND', 'AUTOTUNE', 'STABILIZE', 'AUTO', 'GUIDED', 'LOITER', 'MANUAL', 'FBWA', 'FBWB', 'CRUISE', 'INITIALISING', 'CIRCLE', 'ACRO'])
You can set the mode by entering mode MODENAME on the MAVProxy
command prompt.
For example, the command below shows how to put Plane into CIRCLE mode (this is like Loiter, except that the plane does not attempt to hold position).
mode circle
Guiding the vehicle
Once you’ve taken off you can move the vehicle around the map in
GUIDED mode. Plane will fly to a specified point, and then circle
it.
First change the mode:
mode guided
The easiest way to set a target point is to right-click on the map where you want to go, select Fly to, and then enter the target altitude.

MAVProxy: Fly toLocation
You can also enter the target position manually on the command line using the two formats below. If only the altitude is specified, the last specified LAT/LON will be used.
guided ALTITUDE
guided LAT LON ALTITUDE
Note
Unlike with Copter, you can’t do much with Plane in GUIDED
mode because the mode does not support many commands. This mode is
primarily useful for simply flying to a point.
Setting a GeoFence
A GeoFence is is a virtual barrier that Plane uses to constrain the movement of the vehicle (and move it to a safe location if control is lost). Plane allows you to specify an arbitrarily shaped region on the map for the fence, and an upper and lower altitude. If the fence is breached, Plane will fly to the centre of the fence and circle (or a rally poin)t. Geo-Fencing in Plane describes the fence in more detail.
The fence behaviour is set using the Plane Fence Parameters.
You can list these with param show:
GUIDED> param show fence*
GUIDED> FENCE_ACTION     1.000000
FENCE_AUTOENABLE 0.000000
FENCE_CHANNEL    0.000000
FENCE_MAXALT     0.000000
FENCE_MINALT     0.000000
FENCE_RETALT     0.000000
FENCE_RET_RALLY  0.000000
FENCE_TOTAL      7.000000
Creating the fence is very similar to creating a waypoint mission:
Right-click on the map and then select Fence | Draw.
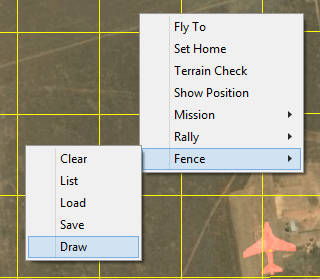
MAVProxy: Draw Fence Menu
Left-click on the map at points where you want the fence “posts” to appear.
Note
Nothing visible will happen when you make the first click. After the second click, lines will join your points to show the path.
When you’re done, you can loop the fence by right-clicking on the map.
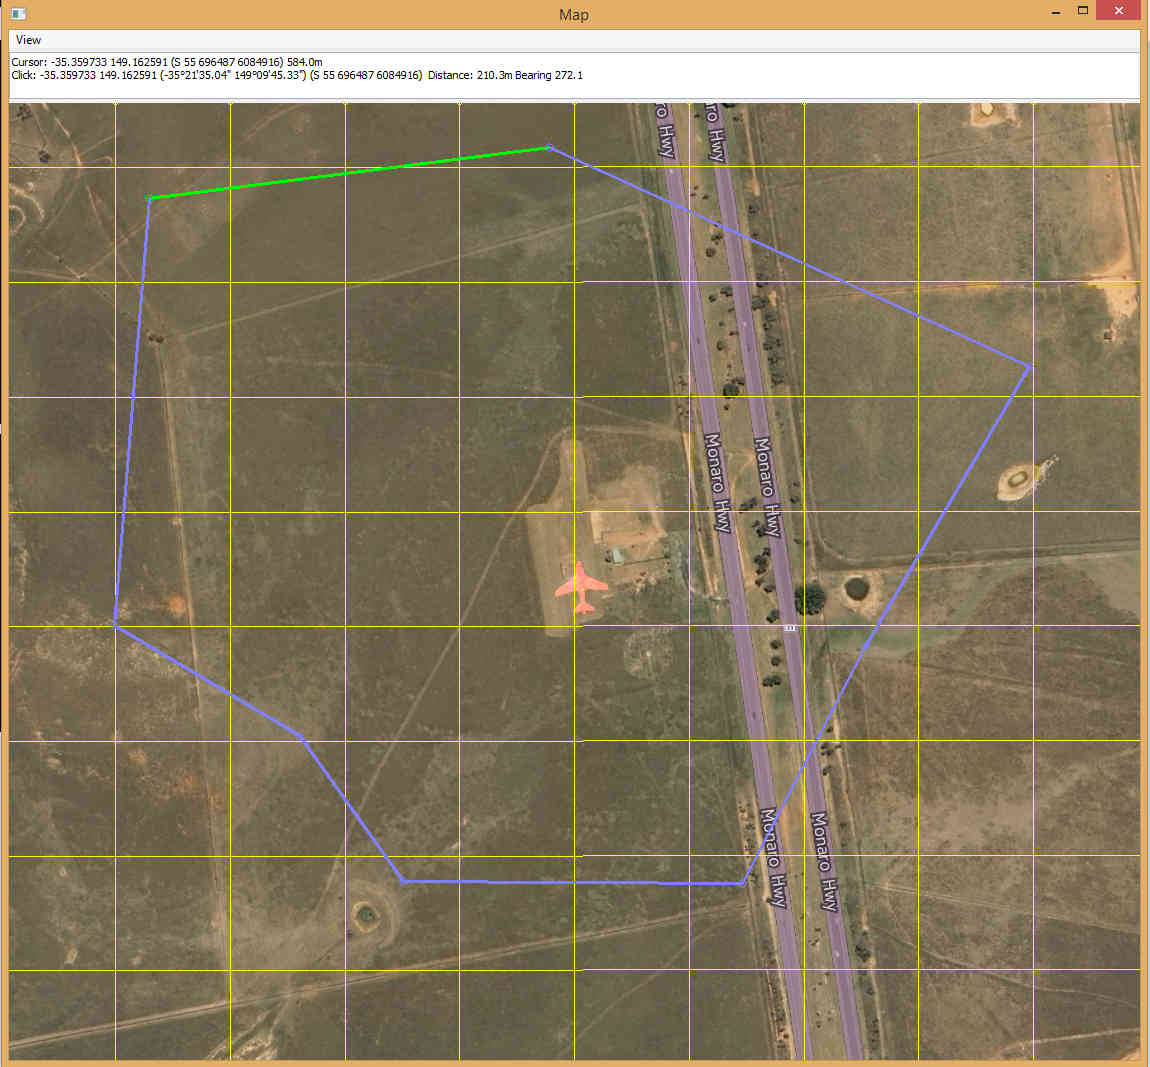
MAVProxy: Draw Fence Points
The fence is initially disabled. To turn it on set the value to one:
GUIDED> fence enable
Now lets make the plane cross the barrier. Assuming you are already flying you can use the following to make it fly straight ahead into the fence:
GUIDED> mode cruise
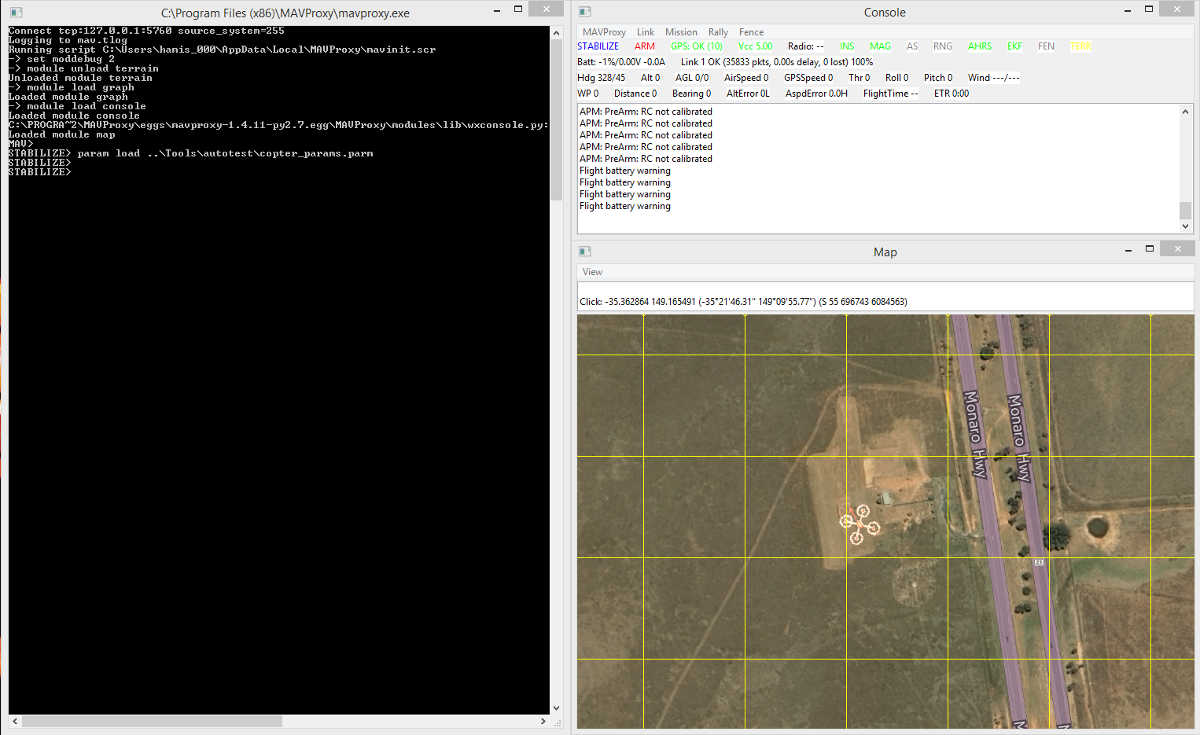
When the fence is crossed, the plane will fly to the centre of the fence region and then circle. The console shows that the breach has occurred.
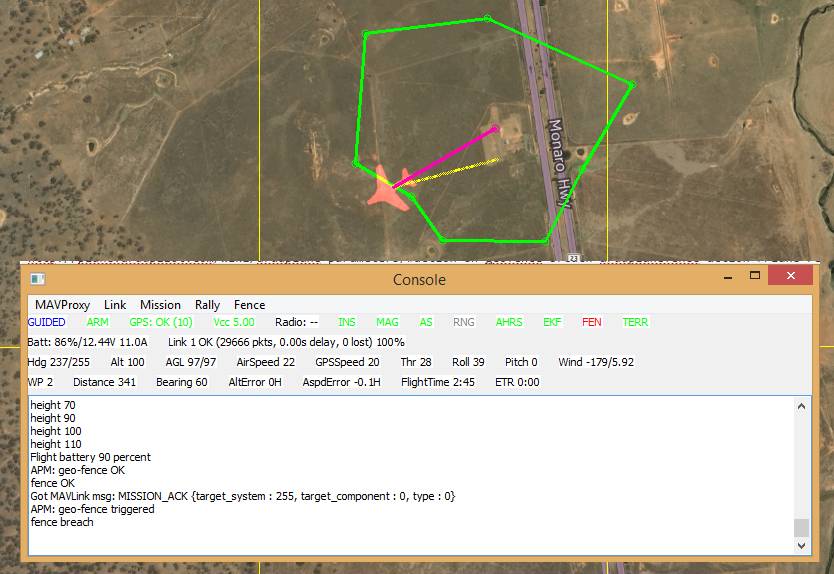
MAVProxy: Fence Breach shown on Console and Map
Instead of flying to the centre of the fence you can instead add a
rally point
to the map and fly to it by enabling the parameter FENCE_RET_RALLY.
Testing the vehicle
MAVProxy allows you to list all the parameters affecting the vehicle
and simulation using param show *, and to set any parameter using:
param set PARAM_NAME VALUE. In addition to affecting the vehicle
itself some parameters simulate the performance/failure of specific
hardware components and the environment (for example, the wind). These
can be listed using: param show sim*. The topic Using SITL
for ArduPilot Testing explains
more about how you can test using SITL.