Using the Command Line Interface to Configure Copter

Warning

The CLI is being phased out on all platforms. The features were massively cut down with AC3.1.5 and then it was removed for the APM2 completely anyway with AC3.2. All CLI functions are now available via regular MAVLink commands in the GCSs. This article has been moved to the dev wiki and may be considered deprecated.

You don’t need to use the Mission Planner to set up Copter (and there are some advanced configuration options not covered by the Mission Planner). You can also use APM’s built-in Command Line Interpreter (CLI) over a serial terminal, which will work on any computer and operating system. It is only available via the USB cable; it cannot be used via a Xbee/3DR wireless connection.

You will also need to use the CLI for such functions as assigning your preferred flight modes to your RC transmitter’s toggle switches. See the menu descriptions below for instructions.

You can enter the CLI by hitting “Enter” three times in the Mission Planner Terminal screen.

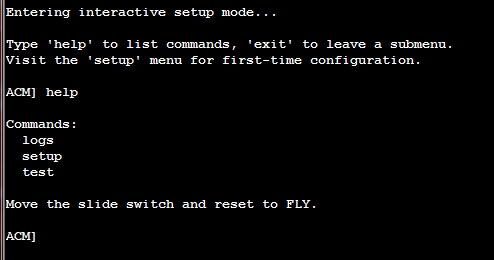
When you open it, it will look like this (with a more recent version number of the software displayed):

../_images/AC2_CLI.png

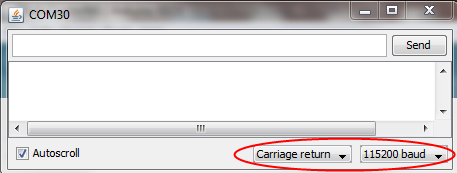
If you’re not using Windows, you can also use the Serial Monitor built into Arduino (remember to select the right baud rate and enable CRs as shown here):

../_images/arduinoserialmon.png

Once you are in the CLI, you can type “help” at any menu and get a full list of available commands.

There are three top-level menus: Setup, Test and Logs.

../_images/CLI1.png

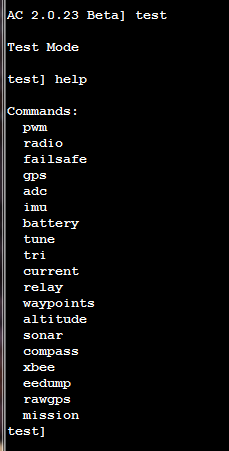
Each has sub-menus, whose command can also be seen by typing “help” when you are in that section.

Setup Menu

../_images/CLI2.png

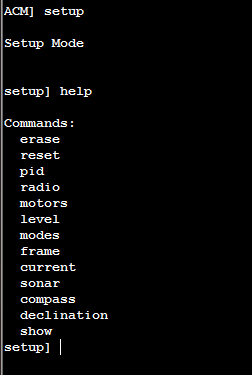
CLI interactive setup - You must go through each item and set the values to match your hardware

“setup” menu:commands:

  • erase: When installing ACM for the first time, run this to erase bad values from EEPROM – just in case!

  • reset: Performs factory reset and initialization of EEPROM values

  • radio: Records the limits of ALL radio channels - very important!!!

  • motors: Interactive setup of your ESC and motors. Enter this mode, then plug-in battery, move your RC transmitter’s pitch/roll sticks in each direction to make the prop in that direction spin (so moving the stick up will make the front rotor spin on a quad, and moving it right will make the right rotor spin). For copters with more than four motors, it will spin groups of motors, with the one closest to the direction of the stick going fastest.

  • level: Sets initial value of accelerometers - hold copter level

  • modes: Sets the flight modes assigned to each switch position (you have 5 available). Use your aileron/roll stick on your RC transmitter to scroll through the options. Full right moves forward through the list; full left moves back. Hit enter to save your settings and exit this mode.

  • frame: Sets your frame config: (x, +, v (Octo))

  • current: Enables an AttoPilot current sensor: (on, off, milliamp hours)

  • sonar: Enable sonar sensor. Sensor hooks to the “pitot” port which is an analog input (on, off).

  • compass: Enables the compass (on, off)

  • declination: Sets your local declination value – lookup online for accuracy (decimal degrees)

  • show: A formatted output of all the settings

Test Menu

../_images/CLI3.png

“test” menu commands:

  • pwm: Outputs the pwm values of all 8 radio channels

  • radio: Outputs the control values of all 8 radio channels in degrees x 100 or other value (see radio.pde)

  • failsafe: (Not currently used)

  • stabilize: Lets you test the stabilization with debugging output to the terminal (may spin the props – not recommended for flying).

  • gps: Outputs GPS data. Note: typically you must be outside to get GPS lock. It can take two minutes or more to achieve lock at first power on.

  • adc: Outputs raw adc values

  • imu: Outputs euler angles

  • battery: Outputs voltage readings to analog in 0-3

  • tune: (Not currently used)

  • current: Outputs voltage and current from an AttoPilot current sensor. Motors will spin, so disconnect your four-wire cable or take off your props!

  • relay: Toggles the relay

  • waypoints: Dumps stored waypoint commands

  • altitude: Displays output from onboard barometric pressure sensor

  • sonar: Displays output from sonar sensor (if attached and enabled)

  • compass: Outputs compass angles in degrees (0 = north)

  • xbee: Outputs an XBEE sequence used for range testing

  • eedump: Raw output of bytes in EEPROM

  • rawgps: Outputs raw, unparsed GPS data

  • mission: Writes a default mission to EEPROM (null, ‘wp’). Choosing ‘wp’ option will send the copter 15 meters North and back again.

Logs Menu

../_images/CLI4.png

“logs” menu commands:

Datalogging

You can use the on-board 16Mb datalogging memory to record information about your flight and the APM’s performance.

Please note that before using the logging for the first time you must “erase” the logs using the CLI (see below). If you do not take this step then you will likely see a lot of invalid logs.

Normally, the slider switch on the IMU shield should be towards the inside of the board, which is data logging/flight mode. But if you boot up with it towards the edge of the board, it will go into the CLI mode. Using the Arduino IDE serial monitor, you can type “logs” to manage and read your log files:

Reading and analyzing logs with the Mission Planner

The easiest way to download and analyze your log files is with the Mission Planner, which will allow you to graph data, generate KML files for Google Earth and otherwise manage the data flexibly.

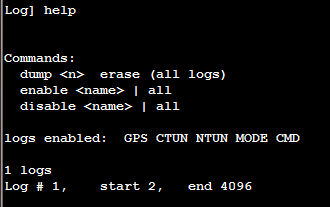
Reading logs through the CLI

You can also download data files with the CLI. Enter it by typing logs in the CLI and hitting the enter key. Here are the available commands:

  • “dump *n*”: Dump log number n.

  • “dump 0”: Dump and erase all logs.

  • “erase”: Erase all logs.

  • “enable *name*”: Enable logging name. Use “all” to enable everything.

  • “disable *name*”: Disable logging name. Use “all” to disable everything.

Here are the field names that can be logged, with the default state shown:

Log name

Default

Function

ATTITUDE_FAST

DISABLED

Logs basic attitude info to the dataflash at 50Hz (uses more space)

ATTITUDE_MED

DISABLED

Logs basic attitude info to the dataflash at 10Hz (uses less space than LOG_ATTITUDE_FAST)

GPS

ENABLED

Logs GPS info to the dataflash at 10Hz.

PM

DISABLED

Logs IMU performance monitoring info every 20 seconds.

CTUN

ENABLED

Logs control loop tuning info at 10 Hz. This information is useful for tuning servo control loop gain values.

NTUN

ENABLED

Logs navigation tuning info at 10 Hz. This information is useful for tuning navigation control loop gain values.

MODE

DISABLED

Logs changes to the flight mode upon occurrence.

RAW

DISABLED

Logs raw accelerometer and gyro data at 50 Hz (uses more space).

CMD

ENABLED

Logs new commands when they process.

CURRENT

DISABLED

Logs current sensor if connected and enabled

MOTORS

DISABLED

Logs motor commands